Wednesday, May 18, 2016

Linux: Why I like it

I like Linux, but I haven't always.

Here's a timeline:
I used to like Windows, but then I got Windows 8...
and then I found Linux...
I kept going with Windows because I didn't like the Ubuntu UI...
Windows choked on AMD drivers while playing War Thunder... It committed suicide.
I switched to Linux Mint with Windows 10 on the side for Space Engineers.
I wrote this blog post some time later about why I like Linux.

Linux has many advantages over Windows. It's free and easy to repair. It's secure and doesn't need to be repaired often. It's technically oriented, and very flexible.

First of all, Linux is completely free and open-source. That means that it can be reinstalled as many times as you want, on as many different computers as you want, and unlike Windows, there's no reason to put in anti-piracy hoops to jump through. The reason for it's lack of price tag is that it's developed by volunteers, people who aren't paid, but want to help make Linux better. Any money that it gets comes from donations. Open source means that the source code is available for everyone to examine and tweak. When the developers of Ubuntu Linux installed spyware to send searches to Amazon, people found out and went crazy. Thus, it got disabled by default. Windows, on the other hand, costs around $200 and requires special product codes that you have to keep track of.

Next, Linux is very secure. It requires your password every time you (or malware) tries to modify root files. This means that you can't accidentally install a virus by running a bad file. You can realize that the file shouldn't need root access, and deny it. Also, Linux doesn't allow programs to run themselves on boot. Viruses will have to get the user to run them whenever they reboot. Last but not least, most viruses and exploits are geared towards Windows, because Windows has around 90% of the personal computer market share. Windows also allows applications to both run without the password (when the user is an administrator), and allows them to run themselves on reboot.

Image found on the Internet

Linux is complicated and technically oriented. The command line is a big part of Linux, and you can use it to bypass the User Interface with a simple 'sudo apt-get install default-jre' to install java, or more importantly, 'sudo mount -t "ntfs" -o ro /dev/sda3 /media/newhd' to mount a broken Windows drive in read-only mode for file-evacuation. For Windows, mounting a broken drive would probably include banging your head against the screen, cursing Microsoft for their broken OS. A Mac user would probably briefly wonder what a hard drive is, and promptly buy a whole new computer.

Image found on the Internet

An interesting fact to note about Linux is that it is the number 1 choice when it comes to web hosting. Not only does it's lack of price tag and secure design make it ideal, but it's light weight and can run on older computers. Several major web-hosting programs like Apache2, PHP, and MySQL run on Linux. In 2011, five years ago, Google had more than 15,000 Linux servers.

That's why I like Linux. True, there are some games out there that are Windows-exclusive (like Space Engineers), but that's why I have Windows 10 on a separate hard drive. All it's got is gaming software (Space Engineers, Offworld Trading Company, etc.). My Linux drive has everything else (Kerbal Space Program, all of my documents, Android Studio, etc.).

If you're afraid that maybe you can't do certain tasks on Linux because Microsoft Word or Paint isn't available to non-Windows computers, don't worry! Linux comes with editors for lots of file types. Libre Office is great for text documents of any kind, and GIMP is a very powerful image editor. Linux computers can access compressed .zip files and .jar files with Archive Manager, and video editors are all over the place (online, not default).

Image found on the Internet

I'll do a blog post at some point about how to install Linux.

Wednesday, May 11, 2016

Arduino Rover Part 3: Motor Control


A few weeks ago, I picked up the Arduino Uno that I've had for a while, and started thinking about what I should build with it. I decided on modifying an old toy rover that I had, and making it wirelessly drivable... but with 2 way audio and a camera feed.

This is the third part of several posts. I will be explaining about my struggles to power the default motors with my Arduino. Prepare for math!

Links:
Part 1: Initial Plan and Reverse-Engineering
Part 2: Preparing the Rover Chassis
Part 3: Motor Control
Part 4: Bluetooth
Part 5: Mounting
Part 6: Batteries
Part 7: The Test

Now that the rover was gutted and is ready for installation, the next thing to do is configure a circuit to power the motors. It can't just be plugging the leads directly into the board. Prior to most of my research, I knew there were problems associated with taking too much current from the Arduino. After my research, I had a much better understanding and could eventually power motors through Arduino.

The maximum safe current from an Arduino output pin is 20 mA. That's 0.02 Amps. Ohm's law states that Current = Volts / Resistance. Using basic algebra to get resistance by itself, we get R = V/A. If we plug in the output values of the Arduino (5 volts, 0.02 A max), we get R = 5/0.02 = 250Ω minimum resistance.

I downloaded the Arduino IDE to my Linux drive (Yes, I use Linux and I love it) and started refamiliarizing myself with the IDE and programming language, which is a variant of C. I'm very familiar with Java (As is obvious from my Minecraft mods), so the learning curve wasn't too large.


I looked up a motor-control circuit, and found this. I recreated it with a motor from an electronics kit.
Measuring the motor's resistance, I got 100Ω, which is fine because the transistor from the same kit was protecting the Arduino. Then I hooked up one of the rover's motors...

Nothing happened.
I tried again: Nothing.
I left the blink program on and listened to the gearbox: Nothing.
Then I touched the transistor...
and promptly pulled my hand back. It was really hot.

I looked up the data sheet for that particular transistor and as far as I can tell, it's got a maximum current rating of 200mA. Measuring the resistance of the motor with my multimeter, I got... holy cow! 0.7Ω! That's supposedly pulling 7.14 A based on 5V/0.7Ω. I tried doing some math to find the right resistor to do the job. I got about 30Ω. I didn't have any of those handy, and figured that if they were designed for use with 4.5 volts from 3 AA batteries and 50Ω didn't work with 5 volts, then this transistor wasn't going to work.

Guess what. 2 100Ω resistors in parallel didn't work...

The headache intensified.

Finally, I gave up trying to use transistors. I went searching online for some relays. Luckily, I found some really good ones, the HE3621A0510, that were just what I needed (Hooray for Capitalism!)


They are rated for 5V, and have 500Ω resistance, thus requiring 10mA, and they only have 4 pins... That's exactly what I needed.


Due to the fact that it's the 510 version, it has an internal diode, (which in my relief I neglected to learn more about).

They came in the mail a day early, and I forgot to look in the giant yellow bubble-wrappered envelope for the bluetooth module (I'll talk about that in part 4).

I mapped all of the resistances with my multimeter. The two outer pins (Shown as green in the picture) had no conductivity, to be connected when electricity flows through the inner two, which had 515Ω. I plugged it into my project, and loaded the blink script...

Nothing. I got nervous, verified connections...

Nothing. The headache from the transistors returned...

I looked back and researched the exact model of relay... Mentions something about a diode.

I researched the Diode Suppressed Coil: A method of protecting delicate electronics from current surge caused by collapsing magnetic field in the coil. Thus, the relay only works one way. Here's more information on how relays and DSCs work.

I switched the direction of the relay, and... Poof! It worked perfectly! I've marked the negative and positive leads in the picture with black and red, respectively.

That concluded my motor-control headaches.

Part 4 will be about bluetooth serial communications and connecting to an Android phone (with a custom app)

Now for more DIY tips:

1. Do your research! I could have saved myself a lot of headache-hours and a burnt finger by just learning more about the transistor and relay I was trying to use.

2. Use Linux (Preferably Mint)

Edit: 6/1/16: Updated list of links
Edit: 7/8/16: Updated list of links
Edit: 8/25/16: Updated list of links
Edit: 7/6/17: Updated list of links

Monday, May 9, 2016

Arduino Rover Part 2: Preparing the Rover Chassis

A few weeks ago, I picked up the Arduino Uno that I've had for a while, and started thinking about what I should build with it. I decided on modifying an old toy rover that I had, and making it wirelessly drivable... but with 2 way audio and a camera feed.

This is the second part of several posts. I will be explaining about what I did to prepare the rover for the arduino and breadboard.

Links:
Part 1: Initial Plan and Reverse-Engineering
Part 2: Preparing the Rover Chassis
Part 3: Motor control
Part 4: Bluetooth
Part 5: Mounting
Part 6: Batteries
Part 7: The Test

Naturally, the first thing to do was to disconnect the two halves. The wires from the motors are soldered to different wires coming out of the brain box, so I cut them about halfway to the brainbox from the solder:
Motor----------=====-----   -----Box

The tubing over the joint slid off, and the insulation on the box-side of the wire followed. Unfortunately, the wires were all threaded, making any connections to a breadboard tedious to say the least. To fix this, I found some wire of the proper diameter (about 22 American Wire Gauge), and soldered it to the motor wire. This gave me more length (and thus more design flexibility), and allowed me to directly connect them to a breadboard.


I am by no means the best at soldering, but it works. I tested each joint to make sure it was strong enough to withstand much more tension than it would ever practically have to take. I also probably should have used color coding for the wires, but... I didn't want to make a bigger mess by opening the black spool. Silly me wound up opening it anyway about 15 minutes later.

Next, I had to replace the wires originally on the battery case with proper 22 AWG wire. All of the connections on the battery case were covered in glue, so I had to pry that off with my nails before using the soldering iron. The wires came off pretty easily, and I was able to reuse some of the solder that was still clumped on the metal case lead for my own wires. This time, I used the black wire for the negative side. While doing this, I noticed that my soldering iron could melt through the plastic. I also found that the heat could make the cheap plastic insulation on the original wires disappear.

That left the headlight as the only thing keeping the guts connected to the chassis. Removing it required unsoldering it from the rest of the guts. In the process, I liberated a devil-resistor (666 ohms according to my multimeter when I first measured it. D: ) from the wire leading to the broken headlight.

After that, none of the original guts remained inside the rover except for the gearbox and some foam that I meant to leave in.


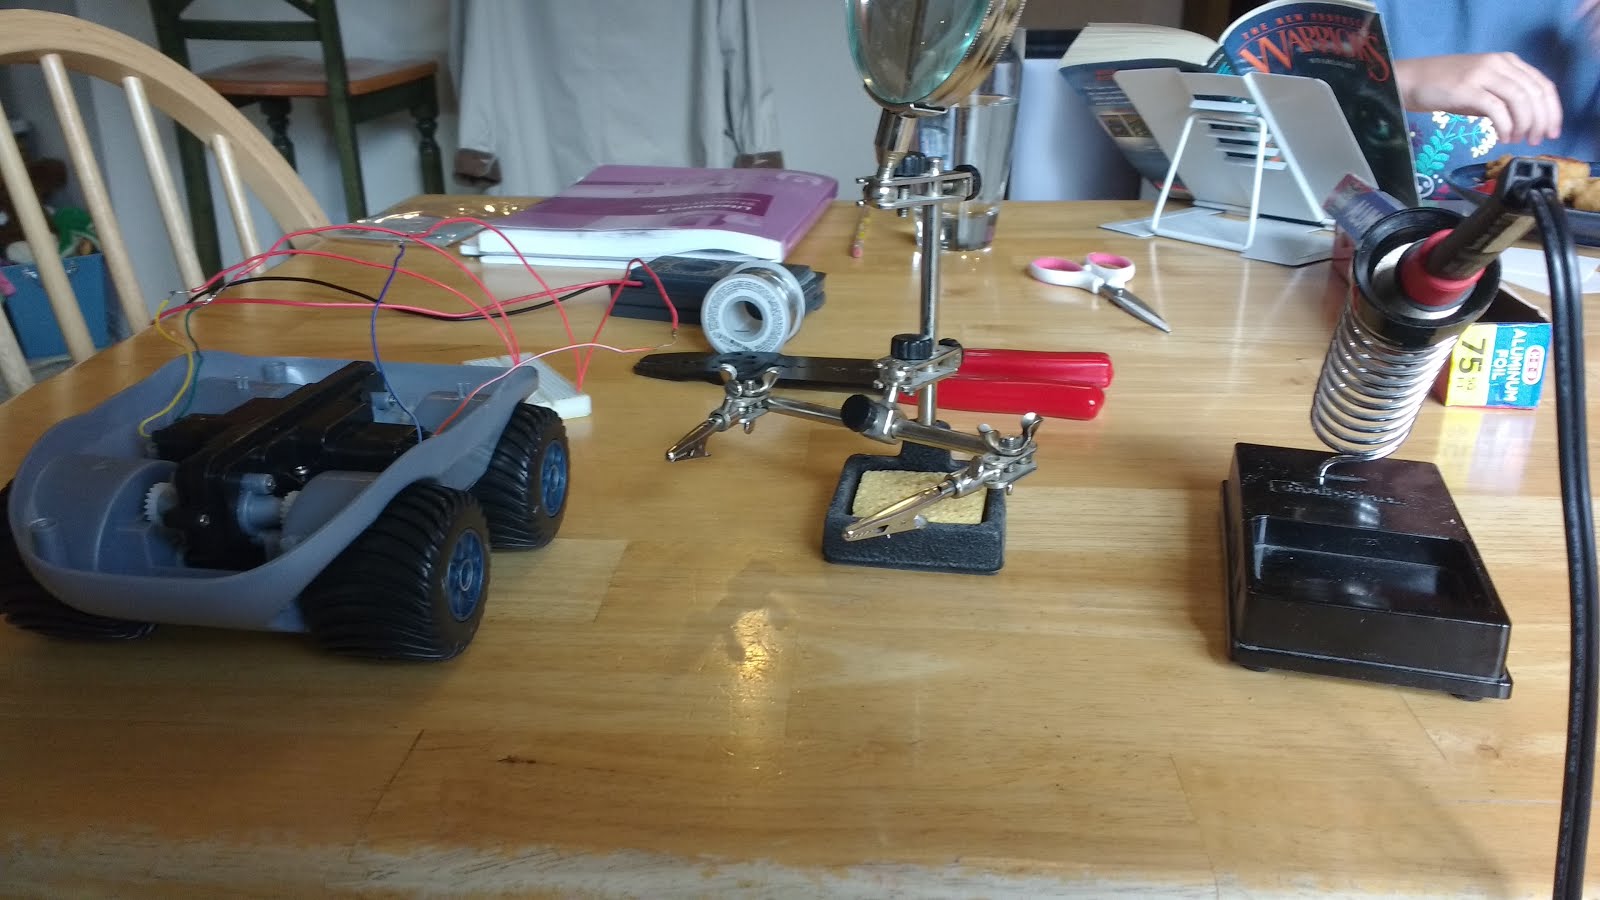
If anyone's interested in my soldering tools, here's a picture:


Here's a list of my equipment:

One 20 watt soldering iron from Radio Shack
One spool of solder, also from Radio Shack
One soldering multi-tool with alligator clippers and magnifying glass... from Radio Shack.
One soldering iron holder... from Radio Shack. Be very careful with the sponge that comes with this. It ate one of my soldering iron tips... You've been warned!

Part 3 will be about my troubleshooting, desperately trying to get the motors to work with Arduino.

As with last time, I have some tips:

1. Plan out what you're going to do beforehand. Don't just shove the soldering iron wherever you see something shiny. ;)

2. Patience is your best friend. Sometimes solder will take a while to absorb enough heat. Give it time. If it heats your fingers holding the solder tube but doesn't melt, maybe you should chop off the tip and keep trying (Works for me.).

3. Be careful to make sure your solder sponge isn't hungry. No idea why, but I've put my hot soldering iron onto the holder's wet sponge... and over time it's eaten away at the iron tip.

4. This might belong in the Part 2, so I'll put it there too: The wires from the motors connect to wires from the brain box via solder. The heat-shrink tubing wasn't connected very well on mine, so I could slide that away from the solder, and after snipping the wires on the brain-box side of the connection, I could just slide the insulation right off.


What should I do with the devil-resistor? Should I...
A: Throw it away
B: Try to get it to explode (Or something exciting) by trying to overload it... I'll include a video.
C: Chop it in half
D: Give the innocent resistor a chance... It's never done anything to me (yet)

Edit: 5/11/16: Updated list of links
Edit: 6/1/16: Updated list of links
Edit: 7/8/16: Updated list of links
Edit: 8/25/16: Updated list of links
Edit: 7/6/17: Updated list of links

Tuesday, April 26, 2016

Arduino Rover Part 1: Initial Plan and Reverse-Engineering.

It's been a while since I've last posted... About nine months. I'll have to get into the habit again.

A few weeks ago, I picked up the Arduino Uno that I've had for a while, and started thinking about what I should build with it. I decided on modifying an old toy rover that I had, and making it wirelessly drivable... but with 2 way audio and a camera feed.

Here's the original rover (Sorry for the low resolution. I don't have any pictures prior to disassembly... Mine was missing a headlight anyway.) It's a shark Kid Galaxy Morphibians toy:
In this first part of several posts, I will be explaining about the insides of this rover after I got clever with a screw-driver.

Links:
Part 1: Initial Plan and Reverse-Engineering
Part 2: Preparing the Rover Chassis
Part 3: Motor Control
Part 4: Bluetooth
Part 5: Mounting
Part 6: Batteries
Part 7: The Test

The first part of disassembly was undoing six screws on the bottomside of the rover. Removing these allowed the top and bottom halves to come apart.

Inside the rover, power wires and antenna connected to a plastic box housing the brains... I couldn't crack it open for fear of breaking everything inside. Then, wires went to two motors, one for each side of the car. After a few glances and attempts to strip the motor wires, it became apparent that all of the wires were both threaded and very thin. Attempts to put them in a breadboard were very discomforting to say the least.


On the physical layout side of things, the battery box, the brain box, and the gearbox took up almost all of the interior space. Not very easy to insert electronics with room to spare. The gearbox was in the middle-bottom, and the battery container was directly on top, eliminating that space almost completely. The brain was at the back, cushioned by foam. Since that's naturally going to have to go, that would seem to be a very good location for batteries to power the Arduino. No way I'm going to be taking the risk of crushing the Arduino itself back there.

I did try to take the gearbox apart, but it reeeally didn't want to open. There might even have been glue inside.


Surprisingly, there were also several more pieces of foam below and around the gearbox, suggesting that the advertising for this particular rover was telling at least part of the truth about potential amphibious capabilities. I'd always kept it out of water anyway, for fear of short circuits.

This rover seems to be pretty well engineered... Too well if I'm going to try to fit my Arduino and a breadboard inside (I'm not).

Part 2 will be about removing the guts and solving the wire-breadboard compatibility issues. It'll involve some soldering.

Until then, I do have some tips on how to go about doing this yourself.

1. There are several different versions of the Kid Galaxy Morphibians... I think Sharks and Gators were the first two to be released. Their internal layout will very likely be the same on all of them.

2. Don't try to open up the brain-box or the gearbox. They're very difficult and you will probably just damage them.

3. This might belong in the Part 2, so I'll put it there too: The motor wires connect to different wires from the brain box via solder. The heat-shrink tubing wasn't connected very well on mine, so I could slide that away from the solder, and after snipping the wires on the brain-box side of the connection, I could just slide the insulation right off.

Edit: 4/28/16: Updated last image
Edit: 5/9/16: Added list of links
Edit: 5/11/16: Updated list of links
Edit: 6/1/16: Updated list of links
Edit: 7/8/16: Updated list of links
Edit: 8/25/16: Updated list of links
        Got bored of just saying "Updated list of links" every single time...
Edit: 7/6/17: Updated... list of... PARTS

Sunday, August 16, 2015

UNSC Armory Crafting Recipes

In my previous blog post, I explained all about my mod. Let me rephrase that, "most things about my mod."

Now for the crafting recipes!

I've taken the time to get screenshots and put them together into a nice, easy format. Enjoy!

Weapons


Magazines


Bullets


Gun Parts


Pyrosenes

The recipes for the Pyrosene require at least one of the previous Pyrosene.
Example: You need two PIs to make a PII,
a PII to make a PIII,
two PIIIs to make a PIV,
and a PIV to make a PV.


Download here!

Edit: Xander Gaming decided to make a youtube mod showcase for this! You should check it out: https://www.youtube.com/watch?v=_giYCF2pPgQ

UNSC Guns Armory Minecraft Mod!

I just published another mod! It adds a variety of guns to Minecraft, all from the Halo universe!


This mod was created out of necessity... Or at least some form of it.

It all started on a server that I host. I had my Frag Fest Mod installed, so creepers were of utmost value...

We had a war...

It was big. One of us wasn't completely sure who's side he was on. He cracked under pressure and took as much stuff out of our chest as he could so that he could escape into the wild.
He was killed.
And killed again.
And killed a few more times.

After the war was over, that same person retaliated. He took as many valuables as he saw out of our chest, and jumped into a pit of lava.

I had a good view of him, and I was reeaaally hoping that I would be able to take him out with an RPG or an arrow. He jumped in the lava pit, and most of the stuff was GONE.

I needed a sniper rifle.


The result of my work since then: Over 40 new items, 11 new projectiles, fully craftable, and over 3000 lines of code!

Guns & Items

Here is a list of all the items for this mod:

Guns
 - Assault Rifle
 - Pistol
 - DMR
 - Battle Rifle
 - SMG
 - Shotgun
 - Sniper Rifle
 - Rocket Launcher
 - Laser Cannon
 - Flamethrower!
 - SAW

Items
 - Assault Rifle Mag
 - Pistol Mag
 - DMR Mag
 - Battle Rifle Mag
 - SMG Mag
 - Sniper Rifle Mag
 - Flame Bottle
 - SAW Mag
 - 7.62x51mm Bullet
 - 12.7x30mm Bullet
 - 9.5x40mm Bullet
 - 5x23mm Caseless Bullet
 - 8 Gauge Shell
 - 14.5x114mm Bullet
 - HEAT Rocket
 - Series 6971 Battery Cell
 - Pyrosene - I
 - Pyrosene - II
 - Pyrosene - III
 - Pyrosene - IV - Pyrosene - V
 - Ammo Counter
 - Analog Ammo Counter
 - Handle
 - DMR Scope
 - Battle Rifle Scope
 - Sniper Rifle Scope
 - SMG Stock
 - Rocket Tube
 - Laser Generator
 - Secret unnamed item to be discovered.

Reloading

The reloading functionality for the guns of this mod is really quite unique... At least, as far as I know. The guns and magazines have their own durability values to store the number of bullets left, and show it to the player.

When you run out of ammo in your gun, an empty magazine of the gun's type will pop into your inventory, and the durability bar will start to regenerate... But you won't be able to fire until it is completely full, and you have the new magazine completely inserted.

Once the durability bar is full, then it will either disappear, or pop into a damaged state, depending on whether you have a full magazine in your inventory.

To load a magazine, simply place the magazine into the crafting table with the proper bullet. Do this until it is full for maximum benefit.

Ammunition
With all of these fancy bullets, you are probably wondering "Which bullet fits which gun?" Don't worry. I have a list for you!

Assault Rifle--------7.62x51mm Bullet
Pistol-----------------12.7x30mm Bullet
DMR-----------------7.62x51mm Bullet
Battle Rifle----------9.5x40mm Bullet
SMG-----------------5x23mm Caseless Bullet
Shotgun--------------8 Gauge Shell
Sniper Rifle---------14.5x114mm Bullet
Rocket Launcher---HEAT Rocket
Laser Cannon-------Craft it with 4 Battery Cells
Flamethrower-------Pyrosene-V
SAW-----------------7.62x51mm Bullet


With your preferred weapon, some extra ammo, and practice, then that army of angry zombies you've been worrying about will be a piece of cake!


Go get em!


Download here!

Edit: Xander Gaming decided to make a youtube mod showcase for this! You should check it out: https://www.youtube.com/watch?v=_giYCF2pPgQ

Wednesday, March 11, 2015

Grenade Mod in Minecraft, 1.8

Lately, I have gotten into modding Minecraft. My project has been making a grenade mod, so my friends and I would be able to have fun with handheld explosives.

It is awesome!

Having a deathmatch with grenades is very fun, and exciting.

There are five types of grenades implemented at the moment, however I have two others that I'm considering.

The first grenade is a simple impact grenade. It hits the ground, and BOOM! a crater!
It actually has only half of the explosive power of TNT, but it has the bonus of being handheld and better transfer of damage to the ground (since it's closer than the center of a TNT block).

Second, is the timed grenade. It has slightly more gunpowder, adding to the explosion! The downside is that it is on a timer, and can bounce. It certainly isn't the easiest!
I see you!
So... tempting... Right... in... the... middle...
In the above picture, the grenade bounced when it hit the ground, and nearly fell off the edge of my testing platform! This bounce factor, however, can easily be turned into an advantage...


The next grenade is one of my favorites from Halo. It's called the sticky grenade. It sticks to whatever surface (or person) it touches, and gives them a short period to shriek before it explodes, usually killing the poor person. I've replicated it with one of the most complex grenades in the mod.

It has the same power as the timed grenade, so if the explosion doesn't kill the victim, the fall damage will.

Last of the implemented hand grenades is the incendiary grenade. It has a minuscule blast. One quarter of TNT's power, but it sets fire to it's surroundings with the internal blaze powder.
Good uses of this grenade would be: Temporary blocking off tight spaces, scaring your opponent into the water (Where he is slow), and burning down bridges.

Now things get even more interesting. I even added an RPG (Rocket Propelled Grenade). It has the same explosion as the impact grenade, but it requires an RPG launcher in order to fire. It has an extremely long range, and is very scary to see coming toward you.
(Just in case you can't see, I got three direct hits)
It has the slowest fire-rate of them all, and it makes a clicking sound if you try to fire faster.

That's all of the implemented grenades.

Want to download it? Here you go!

Download

Grenade Mod: Download!

If you find any bugs, let me know in the comments. I will do my best to fix them.

Planned Features

Additions:
- Smoke grenade
- Grenade launcher (like in Halo: Reach)

Fixes:
- Will fix RPG launcher not staying loaded in between world loads
- Will make grenades gain the momentum of player (making the mod more realistic)